A printed rack
you size to fit.
Ten inches wide, or seven and a half. Size the whole rack in your browser, drop vented panels where you want them, and we print it to order. The frame stacks in three-unit sections, and every panel is generated to its hole pattern before it goes on the printer.
The panel renders in your browser
A 1U blanking panel, drilled on our three-hole M6 pattern: 254 mm wide, 44.45 mm high, 3 mm thick. Its vent is a grid you can use: 5 mm hexagons on 8 mm centres. Clears M4 screws; zip ties up to 3.6 mm. About 39% open. Pick a pattern and the mesh is rebuilt in front of you — the same code that writes the file we print.


How a part gets made
Size the rack
Pick a width, a height in whole 3U sections, and whether to close the floor and the top. Both lines are on ONE hole pattern — three M6 holes per unit at 15.875 mm, on a 254 mm panel at 10 inch and 190.5 mm at 7.5 — so every panel is drilled for the frame it goes in, and anything you add later lines up.
Tune it in the browser
Vent pattern, hole size, density and border — the holes on a stated grid, sized for M3 to M6 screws and zip ties, so a panel is something to mount things on as well as breathe through. Every control rebuilds the mesh in front of you, and the values you leave set are attached to your cart line when you add the part — so the thing you approved on screen is the thing we open in the slicer. Section is ours, not a control: it sets what a part weighs and costs, so we fix it at what the part needs.
We print it and post it
Printed to order in PETG at the values carried on your order line, then posted. Nothing sits in a box waiting for a buyer, which is the reason we can make a part in a size nobody stocks.
Nothing has been fitted yet
Every number on this site is ours and measured off the frame we print. No printed part has yet been bolted to a printed frame; the first kits ship once one has. If something does not fit when it arrives, tell us what it did — that measurement is worth more to us than the sale.
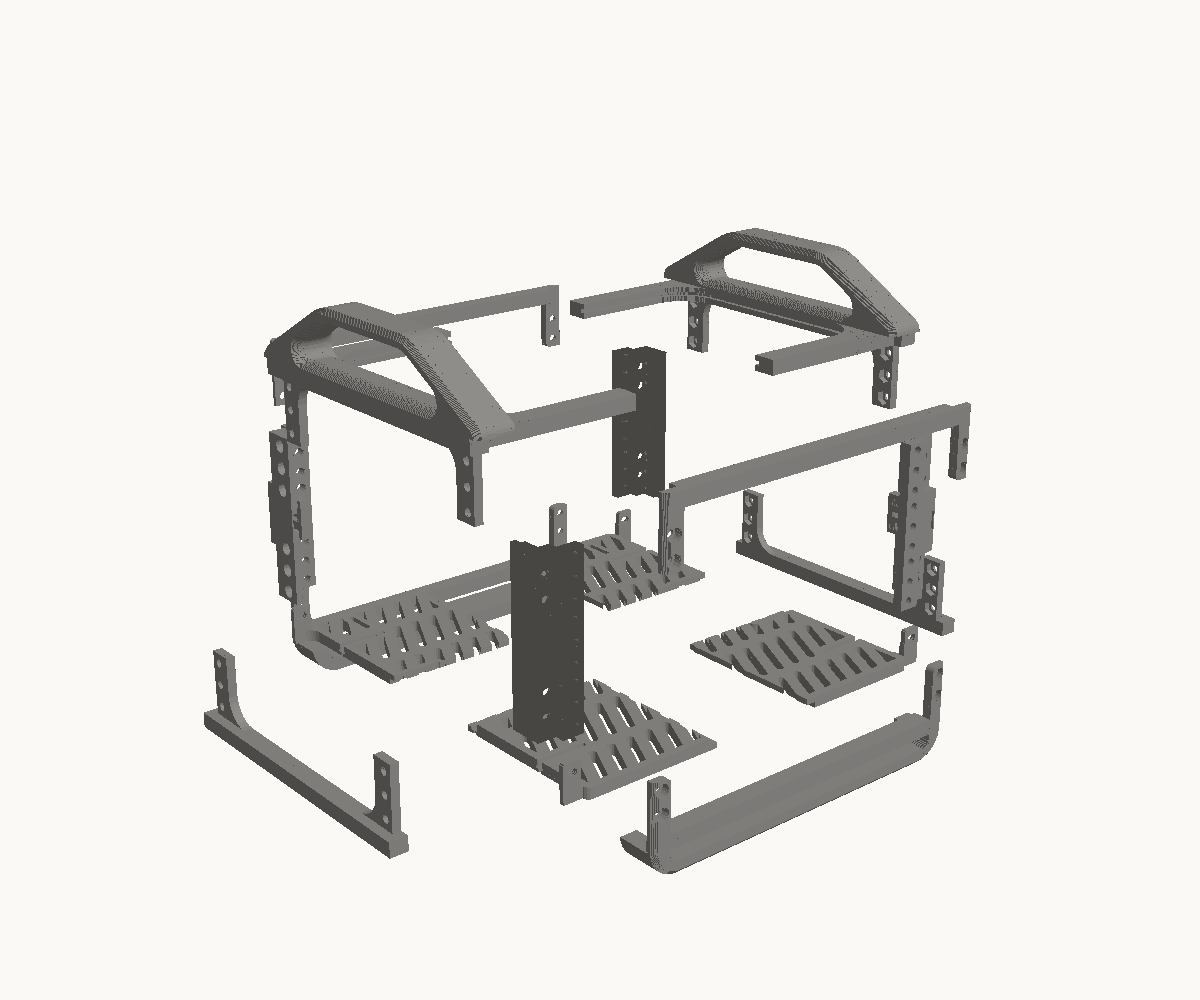
A 3U base kit is 16 printed parts and 44 bolts.
Every one of them is listed before you pay. The heat-set inserts arrive pressed into the posts; you need two spanners and an afternoon. The drawing is the 10-inch kit; the 7.5-inch one is 14 parts and the same 44 bolts, because its base plate needs no cut across it and its posts are the same printed part.
In a 3U base kit
The packing list, generated from the same numbers we print to. The numbers are the ones on the drawing.
| 4 | Post | Number 1 on the drawing |
|---|---|---|
| 2 | Bottom bar | Number 2 on the drawing |
| 2 | Top bar | Number 3 on the drawing |
| 2 | Side rail | Number 4 on the drawing |
| 1 | Base tile, front left | Number 5 on the drawing |
| 1 | Base tile, front right | Number 6 on the drawing |
| 1 | Base tile, back left | Number 7 on the drawing |
| 1 | Base tile, back right | Number 8 on the drawing |
| 2 | Top rail, handle | Number 9 on the drawing |
| 36 | M6 heat-set insert, 8 mm | |
| 40 | M6 nyloc nut (DIN 985) | |
| 40 | M6 x 16 socket screw | |
| 4 | M5 x 20 socket screw | |
| 4 | M5 nyloc nut (DIN 985) | |
Stacking on another 12 parts adds 3U, and the rack stays exactly as tall as the units it holds — the posts butt end to end and the straps bridge the joint, so a joint costs nothing in height.
Size your rackBuild it to the millimetre you need.
Set the height, fill the units you want filled, tune each panel, and send the whole rack to the cart in one go. Prefer to buy a single part? Every panel is still sold on its own.
Build your rack